The PCBs arrive, the LEDs glow, the epoxy resin cures & the kitty travels. It’s time for a new monthly update!

Hey there! And welcome to another monthly update about my LED projects, what progress I made and what comes next!
Last month I skipped the monthly update for the first time since I still had a lot of things to do in Berlin, which I couldn’t do while traveling (and maybe have been going a bit too much in the workaholic direction while getting them done). So now, you get two months worth of updates for the price of reading only one blog post! Let’s get into what happened :)


GlowCore
In July I ordered the newly designed GlowCore PCBs and was happy to see how nice they looked once I got them — and most importantly, that they worked well. The only thing I regret, however, is that I used somewhat small screw terminals. Using larger screw terminals would have allowed also thicker wires to easily connect with the GlowCore PCB. Something I learned while integrating GlowCore as the LED control unit into my bike. Speaking of…


GlowBike
After postponing my plan to fix the LED strips on my bike for way too long, I finally got all the materials together to update my bike setup. At some point in 2020, I added LED strips to my bike. But in a very improvised (and kind of ugly) way. After a while the setup got damaged, the LED strips disconnected and I didn’t want to improvise it again but instead wanted to fix it properly. And that time has come. So what has changed? The old LED strips in their transparent waterproof tube got replaced with new LED strips in a nice white, light-diffusing flexible tube. And the tape that protected the soldering connections I replaced with 3D printed parts I designed (a nice use case for FDM printers, by the way).
As the new control unit I used GlowCore, powered by an external battery from Anker and protected by a 3D printed case that I designed and which should also give decent protection against rain. Good news: it survived the first real test, a very heavy rain shower/storm a few days after I finished the upgrade. I am still not completely happy with the position and size of the 3D printed case for the control unit. And the buttons at the front (for switching animations) are also not ideal yet. But I already have some ideas for how to improve that even further. And overall I am happy with the new upgrade, it looks a hell lot better than the original project and is a lot easier to modify and maintain as well.


GlowSign
After a friend asked me if GlowSign could be also made with a custom image in the middle, I started to get excited about that idea and took this as a chance to redesign the previous prototype of GlowSign and further improve it. I designed new PCBs, and a new case, and combined that with a sticker that is taped to an acrylic sheet, protected by a second acrylic sheet on top. The result is a cool looking LED sign that not only looks good when it glows but also when it’s off. In the dark, this looks especially awesome, since the sticker is backlit by the LEDs.
Also: GlowSign is designed to be easily customizable. Just unscrew the screws on the back, remove the case and switch out the acrylic sheet with the sticker — and if you like, you can also just replace the aluminum PCB with one that has another cutout (at the beginning you can choose between a round and a square shape cutout for your image).
The new GlowSign will exist in two versions: a thin USB-C-only version and a portable battery-powered version (which of course can also be powered and charged by USB-C). The battery-powered version is designed for a 3000mAh battery, giving it plenty of endurance to glow for hours non-stop.
That’s the goal at least. And the new USB-C-only prototype I build also worked perfectly, without issues. But annoyingly, the power converter chip of the battery-powered version gives out 2V instead of the 5V it’s supposed to give out (when a regular battery, with regular 3.2V for example, gets connected as an input…). Which is way too low for GlowSign to power up. I am sure I gonna fix that issue, but of course, it’s still frustrating to deal with such issues and try to figure out what causes them. But that also makes it even more exciting once you finally fix the issue and build a project that just works as expected!


GlowLight & GlowTower
I also made some last improvements to the main PCB of GlowLight and GlowTower, to allow the software on the microcontroller to recognize, if USB-C and/or DC power is connected, which can be used for automatically adapting the light brightness of the LED lamp, in a future software update. And once the main PCBs arrived (together with the custom LED strip PCBs I designed and the button PCB for GlowLight/GlowTower), I was super happy to see how nice they looked (in comparison to my previous hand-soldered PCBs) and that they worked just as expected in a quick test. Awesome!


MagiqWand
In July I also received the 3D printed cases which we ordered for building 10 MagiqWand prototypes (and then giving them to friends for feedback). And it keeps impressing me that the quality of those SLA 3D pints from JLCPCB is noticeably better than those from the (consumer) SLA printers I used before.
The original plan was to get the 10 prototypes ready for the festivals this summer. But because of unexpected technical issues that didn’t work out as expected. Turned out: the last 10% of a project can easily take up more time than the other 90% of a project, especially when the project involves batteries, especially if you just learned how to design PCBs. So I made the changes needed which I thought should fix the remaining battery issues (more specifically, the voltage converter converting battery voltage to 5V was overloaded when the MagiqWand was turned on, stabilizing itself only after 1–2 minutes or so). And while I was already at it, why not also make some smaller improvements, like connecting the USB-C voltage (with a voltage divider) and the battery charging status to the microcontroller, so the software on the microcontroller can recognize if USB-C is connected and if the battery is still charging. Nothing can go wrong, right? So we ordered 10 of those PCBs in July, with the front fully assembled (and I would then add the LEDs and battery connector to the back side). So they could still arrive in time before a festival in Germany where we wanted to present the MagiqWands. Well… as I learned now, even making changes that one thinks are not major changes, can completely break how the circuit works and cause very confusing issues. So the frustrating result was: first, nothing worked as expected, I couldn’t even upload software to the microcontroller. Thankfully that issue was super easy and fast to fix.

But once I had WLED uploaded to the MagiqWand and tried to make it glow… the real problems began. Suddenly parts of the power supply circuit (which have worked fine before and which I did not change) suddenly caused the voltage to be super unstable — causing all kinds of LED flickering and heat issues. And while I was able to improve the situation and reduce how often those issues show up… I still haven’t been able to fully solve them, which was super frustrating and demotivating. Especially because we had now 10 somewhat working, somewhat broken PCBs… But I know that by talking to other people who are experienced in electronics, I will find and fix the issue eventually. More on that later.
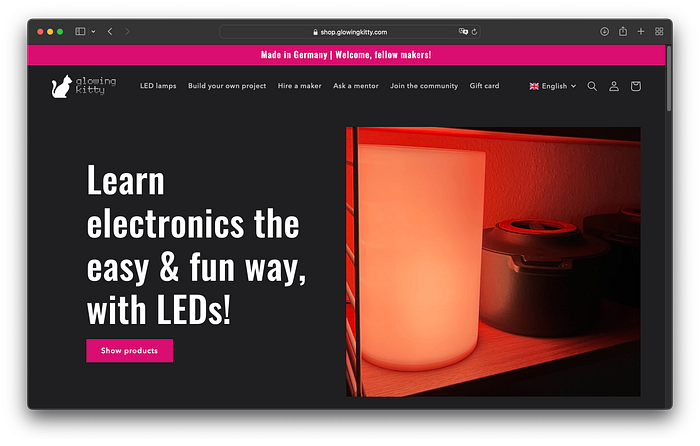
Online shop
After a lot of work, I am happy to announce that I released my online store. Check it out :) There you can find my GlowCore Dev Board, as well as the GlowLight, GlowTower, and GlowTube lamps as an easy-to-build DIY kit — including free onboarding workshops with me in Berlin (access to soldering equipment included as well).
At the moment the product photos are a mix of photos of previous prototypes as well as renderings of the latest design. But around the end of September, I will also add new and better-looking photos of the latest designs.
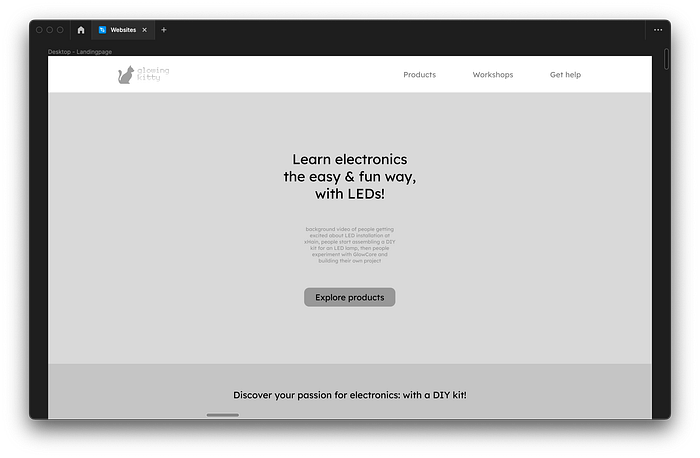
New website
In addition to the online shop, I also worked on building a new main website. The idea is that the main website will give you all the resources to learn all the details about my LED projects & products and get excited about them. While the online store will focus on giving you an easy and fast option to buy the products.


Resin casting
I was thinking about how to produce the case parts of my LED lamps, it became quickly clear to me that 3D printing every case myself and spending a lot of time post-processing each piece is not a practical solution. But the same applies to buying 3D prints of the case parts somewhere else (which is expensive) and then waiting for shipping and so on. Instead, I found a much better solution: resin casting, using silicone molds and epoxy resin. This way I can reliably produce the same part over and over again, without having to wait for 3D prints from JLCPCB to arrive and it’s also cheaper. At least the cost of the epoxy resin vs the 3D print, but yeah… the silicone mold is at first a bit more expensive. Another cool advantage of this method: one can easily customize the color of the case! To everything from a translucent white, to a completely light blocking white, to red, green, another color, or even a metallic look! At first, however, I will use white for the case parts and then later see how well different colors look.
My first experiment with epoxy resin (duplicating the button for GlowLight/GlowTower) was promising. So I continued with a second experiment, duplicating the top case of GlowLight/GlowTower. But then it happened… I forgot to apply the silicone mold release spray before I created the second half of the silicone mold. And since silicone only sticks to silicone, I now had a part locked in silicone, instead of two silicone mold parts. After cutting the mold open I already wanted to call it a failure and was frustrated about that mistake. But I still used the chance to try a resin cast anyway. And the result (considering the bad mold) wasn’t actually that bad and gave me a preview of how cool the case made out of epoxy can look.


So my main learnings from those experiments: instead of making a two-part silicone mold of an existing 3D printed part, I should design and order 3D printed parts that are designed to create the two exact silicone mold parts I want — so I don’t need to use any silicone release spray. This also allows me to integrate the hole for adding the epoxy resin as well as the air vents directly into the print. So I don’t need to remember adding those vents later and it also results in a better quality silicone mold and epoxy clone.
So that’s what I did — designing those new parts and ordering them as a high-quality SLA print from JLCPCB. Looking forward to testing them out, once they arrive later in September. Also, next time I will use a syringe for pushing the epoxy resin into the mold, so I actually end up filling the whole mold with epoxy resin, not just part of it. In addition, I heard now a few times about the recommendation to use a pressure tank for letting the epoxy resin cure while crushing all remaining air bubbles inside the resin. Something I will also try out and see if that further improves the resin cast quality.


US trip
About a week ago I arrived in the Bay Area, for the first time in years. And I already had some great conversations and super useful feedback from people — on hardware development meetups, in hackspaces, and by getting to know new people in the city. From one person who used to be part of the local Noisebridge hackspace for example I got some advice on how I could fix my battery-powered projects. And if that doesn’t do it, another person I got to know advised me to use well-known western brands like Texas Instruments for chips that seem to cause problems in my circuit, instead of using chips from Chinese brands for that. Which is another possible approach (and considering how much more in-depth the datasheets from Texas Instruments for example are in comparison to the Chinese companies… I can definitely imagine how switching the component can fix the issues I have).


One of the events I have been to was a hardware development meetup at Sudo rooms, the hackspace in Oakland. With some super friendly people from Oakland and a lot of familiar faces from Noisebridge as well. There I also got a lot of positive feedback about the LED projects I developed so far. It also felt got to hear people being impressed by how much learning progress I made since 2020 when I started focusing more and more on my LED projects.
There are definitely a lot of problematic parts about San Francisco and the US in general, which I started to notice a lot more this time, after spending most of my time in Berlin in recent years and seeing the contrast now more clearly. But despite that, I am still glad to be here and to get out of the daily routine back home in Berlin. It’s also great to see that the Noisebridge hackspace here in SF is doing well since they moved into an even larger space than before (and the old space was already very large for a hackspace) and that there is a very active community. Looking forward to the remaining time of my trip, before going back to Berlin.


Text to image AI
Besides my LED projects, the tech topic that kept me busy and excited the most was for sure text-to-image AI. It’s just mind-blowing, what progress has been made within the last few months when it comes to AI. Dall E 2 was launched in a close beta and after a month on the waiting list, I was able to join and test it out myself and was really impressed by the quality of the images one can create with it. Stable Diffusion, an open source text-to-image AI was also released and already made a giant impact on the text-to-image AI world. And Midjourney, which I also recently tried out for the first time, also got another huge quality improvement update. It’s difficult to predict exactly how this technology will continue to evolve and the impact it will have on society. But it’s very clear that text-to-image and text-to-video AIs will get better and better at a rapid speed and will forever change how we create media. Which is both incredibly exciting but also deeply worrying at the same time. On the one side, it enables creatives to play around with ideas much faster and create way better designs and more complex projects than they previously have been able to. But it also means we will see a rise in AI-generated images used for propaganda, disinformation campaigns, hardcore porn, and fake images of real people to cause them harm — among other problems. So yeah, what a time to be alive… both in an exciting way, but also in a terrifying way. And we don’t know for sure how this technology will continue to evolve — except that the quality of the results will continue to get better and the use cases will continue to expand. But what I do know — is what I will continue to focus on in September. Let’s talk about that!
What comes next in September:
As long as I am still visiting the US, I will continue to reach out for feedback and advice from people with hardware & startup experience, especially in the open source hardware area — to get a clearer picture of the direction I want to focus on in the coming months and to improve what I already built. I will also start implementing the fixes to the battery electronics of MagiqWand and GlowSign, which I got recommended. Plus: I will build the new main website, to give you all the most important details about my LED projects in one place. A new meetup group is also on the to-do list and I will start organizing meetups and workshops in Berlin, to teach people about how awesome LEDs are and how to get started with building LED projects. And once I am back in Berlin, I will build the case parts for GlowLight & GlowTower with epoxy resin — but this time with a decent silicone mold. Like always, a lot of things ahead, but I am really looking forward to those things :) If a monthly update isn’t enough for you and you want to see more updates of what I am working on, as well as joining a community of LED enthusiasts and share also your own project ideas with others — then join our free Discord community! Hope to see you there and that you liked this in-depth update. See you next time, for the next monthly update blog post in October :)